You’ve probably heard about blend modes available in image and video editing tools like Photoshop or After Effects. It is an important technique for content creation and has long since become an integral part of them.
But what about video games?
Say you need to use Color Dodge blending for a particle system. Or your UI-artist made a beautiful assets in Photoshop, but some of them are using Soft Light blend mode? Or maybe you’ve wanted to create some weird Lynch-esque effect with Divide blending and apply it to a 3D mesh?

In this article I will describe the mechanics behind popular blend modes and try to simulate their effect inside Unity game engine.
In case you are looking for a complete solution to use the blend mode effect in Unity, try this package on the Asset Store: http://u3d.as/b9w
Blending algorithms
For starters, let’s define what exactly we need to do. Consider two graphic elements, where one overlaps the other.
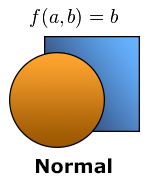
This is the example of Normal blend mode: each pixel of the lower layer (a) is completely overridden by the pixels of the layer that covers it (b). The most trivial case possible — most of the objects “blends” like this.
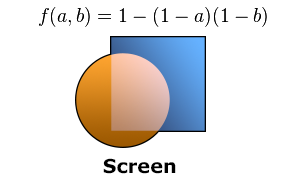
While in Screen blend mode, colors of both layers are inverted, multiplied, and then inverted again. Let’s implement this algorithm using Cg programming language:
 fixed4 Screen (fixed4 a, fixed4 b)
 {
    fixed4 r = 1.0 - (1.0 - a) * (1.0 - b);
    r.a = b.a;
    return r;
 }
Note we are passing the alpha value of the upper layer (b.a) to the alpha of the resulting layer (r.a), to be able to control the opacity of the material.
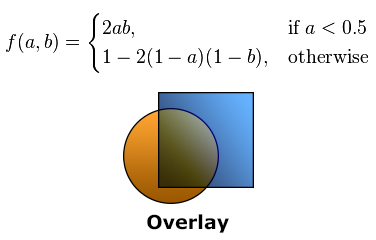
Overlay algorithm is conditional: for the “dark” areas we are multiplying the colors, for “light” — using the expression similar to Screen.
fixed4 Overlay (fixed4 a, fixed4 b)
{
    fixed4 r = a < .5 ? 2.0 * a * b : 1.0 - 2.0 * (1.0 - a) * (1.0 - b);
    r.a = b.a;
    return r;
}
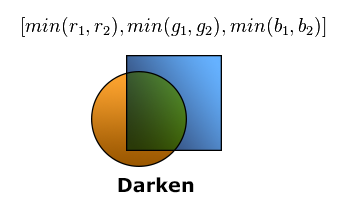
In Darken mode RGB components of the layers are compared and only the “darkest” left in the resulting color.
fixed4 Darken (fixed4 a, fixed4 b)
{
    fixed4 r = min(a, b);
    r.a = b.a;
    return r;
}
Other modes are implemented in a similar ways and writing about all of them will be boring, so (in case you are interested) I’ve put implementations of the 18 remaining blend modes in Cg here: gist.github.com/Elringus/d21c8b0f87616ede9014.
Thus, in general terms, the problem can be summarized as follows: for each pixel of the object (b) find the pixel that is drawn “behind” it (a) and blend their colors using selected algorithm.
Implementing with GrabPass
Having all the blending algorithms implemented it may seem that only the trivial part of the work is left: to get the “a” — color of the pixels located “behind” our object. However, this step proved to be the most problematic.
In order to get that “a” layer we need to access the frame buffer, and we need to do this inside the fragment shader to be able to perform the blending algorithm per pixel. At the same time, the logic of the rendering pipeline won’t allow us to do this directly.
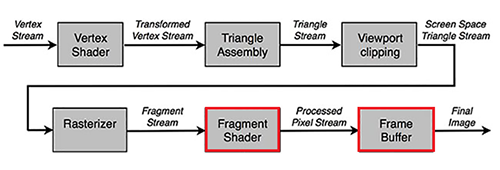
The final image (which contains the data we need) is formed after the fragment shader execution, so we can’t access it directly from the Cg program. Therefore, we need to find a workaround.
In fact, the need for the final image data within the fragment shader occurs quite often. Most of the post processing effects implementation, for example, is unthinkable without accessing the final image inside fragment function. For such cases, there is the so-called render to texture technic: the data from the frame buffer is copied to a special texture, which is exposed for reading on consecutive fragment shader run.
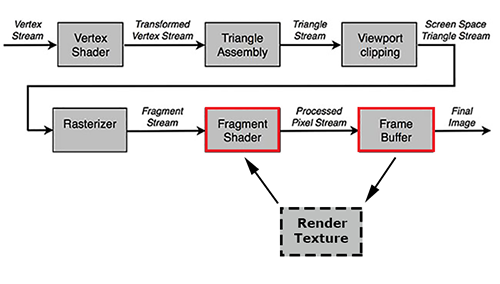
There are several ways to work with render texture in Unity. In our case, the most appropriate would be to make use of GrabPass.
GrabPass is a special passtype — it grabs the contents of the screen where the object is about to be drawn into a texture. This texture can be used in subsequent passes to do advanced image based effects.
Just what we need!
Let’s create a simple shader for UI-graphics, add a GrabPass to it and return the result of colors blending using the Darken algorithm: GrabDarken.shader
To evaluate the results, we will use the same textures we used in Photoshop during blend algorithms demonstration.
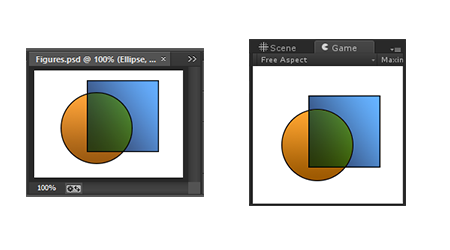
As you can see, the results in Unity and in Photoshop are visually identical. Win? Not really…
Render to texture is a somewhat “heavy” operation. Even on average PC, using more than 100 of such effects leads to a noticeable frame rate drop. The situation is aggravated by the fact that GrabPass performance is inversely related to the display resolution. Imagine what performance would be if we run such procedure on some iPad with an ultra HD display? In my case, even a couple of UI-objects using GrabPass inside an empty scene dropped framerate below 20 FPS.
Implementing with Unified Grab
One optimization suggests itself: why not use a single, unified GrabPass? The original image remains unchanged per frame, so it should be possible to “grab” once and then use the data for all the subsequent blend operations.
Unity allows to implement the plan in a convenient way. Just pass a string inside GrabPass expression and the unified grab texture with this name will be created and used in all the passes per frame.
GrabPass { "_SharedGrabTexture" }Now every material instance using this shader will first check if GrabPass was already performed at the current frame and will try to reuse the “shared” grab texture. Like this, we are able to perform many blending operations at once without any serious performance penalty.
Unfortunately, this solution has one significant drawback: as different objects use the same texture to get information about the “back” layer, it becomes identical to them. That is, such objects can’t “see” each other and do not consider this information when blended.
The problem becomes obvious if we stack two objects with the blend effect onto each other:
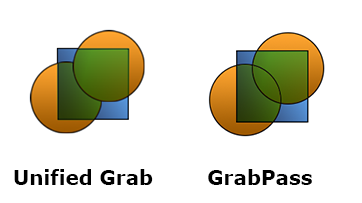
In addition, even one single GrabPass per frame may be too “expensive” for mobile devices, which means we have to look for alternative approaches.
Implementing with BlendOp
If using GrabPass in any way is a no-go, let’s try to achieve the goal without it. One option: try to change blending mode performed after the fragment shader execution (in context of Unity rendering pipeline):

This step is mostly used for processing semi-transparent objects and there is not much we can modify here. The blending logic is controlled by the special expression, which uses two keywords to specify operations for source and destination colors.
Blend SrcFactor DstFactorThe source color (returned from the fragment shader) is multiplied by the value returned from the first operand (SrcFactor), the destination color (the color of the “back” layer) is multiplied by the second operand (DstFactor) and the resulting values are added. List of operands, in turn, is fairly limited: it is possible to use 1, 0, the source and target colors, as well as the results of their inversion.
The optional BlendOp command somewhat expands our “power”, allowing to replace the addition of two operands with subtraction, taking their minimum or maximum.
Using these instruments, I was able to reproduce the following blend modes:
// Darken
BlendOp Min
Blend One One

// Lighten
BlendOp Max
Blend One One

// Linear Burn
BlendOp RevSub
Blend One One

// Linear Dodge
Blend One One

// Multiply
Blend DstColor OneMinusSrcAlpha
Let’s modify our UI Darken shader to use BlendOp instead of GrabPass: BlendOpDarken.shader
Using the same textures to evaluate the result.
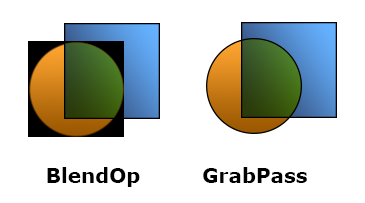
The problem is obvious: we are using alpha blending stage for our needs, so the transparent areas of the texture are not handled correctly. On the other hand, opaque objects are rendered correctly and with great performance. Thereby, if we need to blend an opaque object and the blend mode could be reproduced with the Blend and BlendOp expressions — it could be the best way to go.
Edit 21.06.15: With Unity 5.1 release the engine now supports so called “advanced blend modes” which allows using 11 blend modes with the BlendOp function. Device has to support GL_KHR_blend_equation_advanced or GL_NV_blend_equation_advanced extensions in order for this to work. For more info: http://docs.unity3d.com/ScriptReference/Rendering.BlendOp.html
Implementing with Framebuffer Fetch
Previously I mentioned that it is impossible to access the frame buffer from the fragment shader. Actually, there is an exception.
In 2013, the EXT_shader_framebuffer_fetch function has been added to the OpenGL ES 2.0 specification, which allows retrieving frame buffer data from inside the fragment shader. Moreover, a few months ago, in Unity 4.6.3 release this feature was exposed to the Cg.
Let’s modify our UI shader to use Framebuffer Fetch: FrameBufferFetchDarken.shader
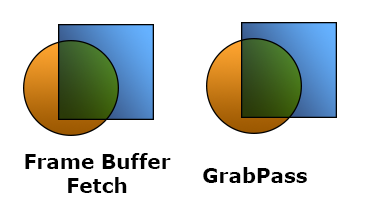
Perfect. What else could we actually wish? No extra operations, maximum performance, any blend logic can be implemented with ease… Except that illustration above is a piece of a screenshot captured from iPad Air. And in Unity editor, for example, our shader would simply refuse to work.
The thing is that only the iOS devices fully supports OpenGL ES specification. And on other platforms (even if their graphic subsystem uses the OpenGL ES API), the framebuffer fetch function may not work at all.
Summary
We looked through four different blend mode implementations in Unity game engine:
- GrabPass is costly, but also gives the most correct results in any situations;
- Unified Grab provides a significant performance boost when using blend effect with multiple objects, but also prevents the objects from blending with each other;
- BlendOp is the fastest solution but also is the most limited one — only a few modes could be achieved and we can’t use semi-transparent objects with it;
- Frame Buffer Fetch is also extremely fast, allows simulating any blend modes, but could only be used on iOS devices.
I wasn’t able to find one universal solution, but using all four allows to make use of blend mode effect in the most cases.
To see all the work in action, here is a video demonstrating blend modes applied to the GUI, particle systems, 3D meshes and sprites in Unity:
And a WebGL demo: https://elringus.me/static/blend-modes-webgl/
In case someone will want to experiment with the solutions described in the article, here is a simple Unity project with the materials I used for the demonstration: https://github.com/Elringus/BlendModeExample

Comments